🛒 Visual How-To: Fitting, Storing, and Maintaining Pontoon Covers
A pontoon cover is the single cheapest insurance against UV damage, bird droppings, tree sap, and the mildew that turns a $2,000 set of seats into a reupholstery job. But forum after forum is full of owners asking the same question: "Why does my cover pool water, sag in the middle, and blow off in every storm?"
The answer is almost always installation — not the cover itself. As owners comparing full covers versus snap-on options consistently find, the right cover type paired with correct installation makes all the difference. This guide walks through fitting, support pole placement, strap tensioning, and storage in visual step-by-step format designed for the owner who would rather look at clear steps than read a 40-page manual.
📊 Cover Types: Which One You Actually Need
| Type | Best For | Material | Lifespan | Price |
|---|---|---|---|---|
| Mooring cover | Between-use protection on a lift or trailer | 600D polyester or Solution-dyed polyester | 3–6 years | $250–$600 |
| Trailering cover | Highway transport at speed | Heavy 600D+ with reinforced seams | 4–7 years | $350–$800 |
| Winter storage cover | Outdoor winter storage (snow load, freeze/thaw) | 900D+ or marine canvas with snow vents | 5–10 years | $400–$1,200 |
| Snap-on playpen cover | Quick cockpit coverage on lift | Sunbrella or equivalent solution-dyed | 8–12 years | $800–$2,500 (custom) |
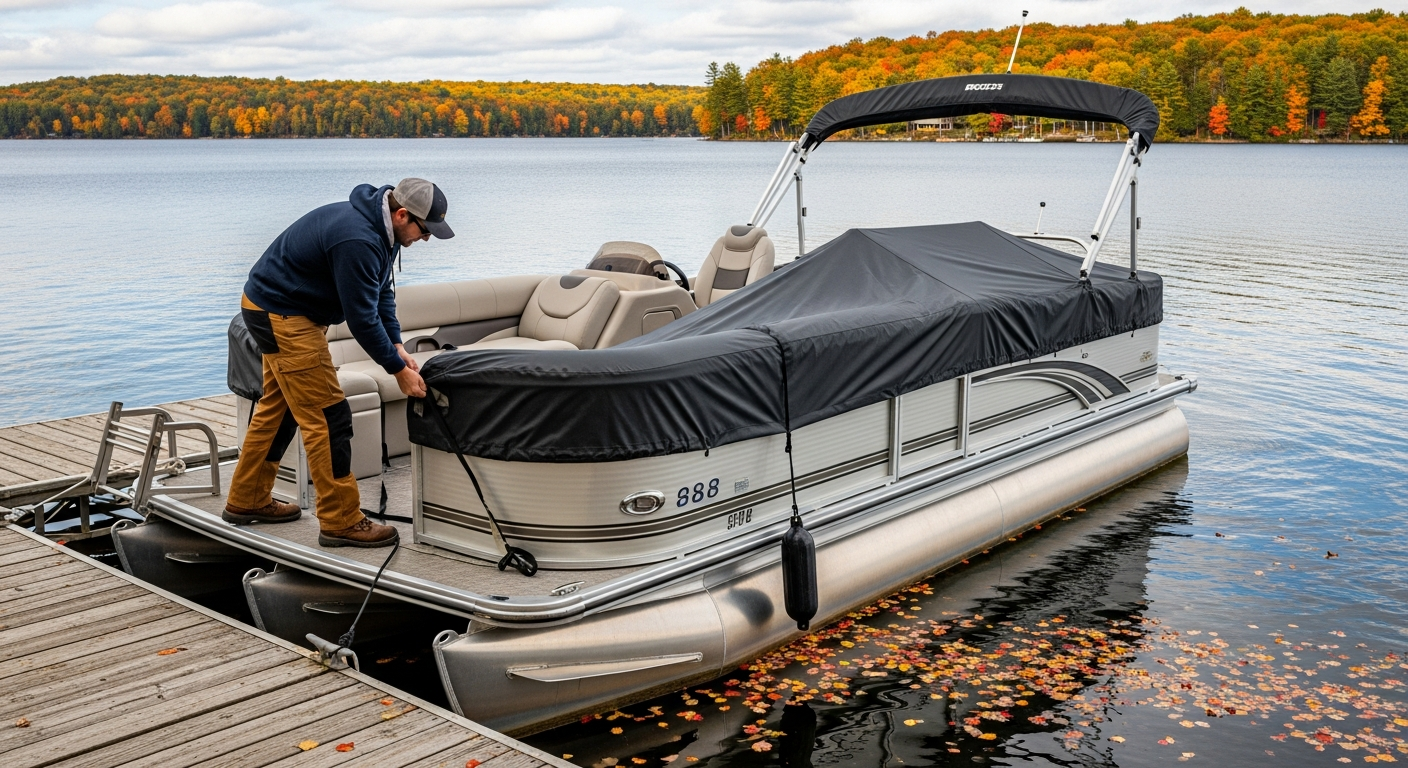
🔧 Step-by-Step: Fitting a Pontoon Cover
Lower everything that sticks up
Fold down the bimini top completely. Lower any antennas, ski tow bars, or fishing rod holders that protrude above the fence line. Every protruding object is a stress point where the cover fabric will wear, stretch, and eventually tear. The cover should drape over a smooth, even profile.
Install support poles first
This is the step most owners skip — and the reason their covers pool water. Support poles (adjustable telescoping poles, $15–$30 each) go under the cover at every low point where water would collect.
- Minimum 2 poles for boats under 22 feet
- Minimum 3 poles for 22–26 foot boats
- Minimum 4 poles for boats over 26 feet
Place poles at the center of each flat span between the helm console, furniture groups, and the stern. The goal is to create a tent-like peak at every potential water collection point. Adjust pole height so the cover slopes downward in all directions from each peak — water runs off the sides instead of pooling.
Pro tip from PontoonForums: Put a tennis ball or pool noodle section on top of each pole to prevent the pole tip from wearing through the cover fabric. This alone extends cover life by 1–2 seasons.
Drape the cover bow to stern
Start at the bow. Unfold the cover and drape it forward over the bow fencing, then walk it back toward the stern. Do not pull it tight yet. Let it settle over the support poles and find its natural drape.
Identify the bow and stern — most covers are not symmetrical. The bow end is usually narrower and may have a notch or seam for the bow gate. The stern end is wider and has a cutout or drawstring for the engine.
Secure the engine cutout
Thread the drawstring or elastic cord around the engine cowling. The cover should sit snug around the engine without pulling tight against the powerhead. Leave enough slack for air circulation — a cover sealed tight against a warm engine traps moisture and accelerates corrosion inside the cowling.
Tension the straps — bow to stern, then sides
Secure the bow strap first, then the stern strap. This sets the fore-and-aft tension. Then work the side straps from center outward toward bow and stern.
The correct tension is snug but not drum-tight. A drum-tight cover has zero give in wind — gusts will rip straps off cleats or tear grommets out of the fabric. A cover with slight give absorbs wind gusts by flexing, then settling back. Think of it like a trampoline, not a drumhead.
- Strap routing: Run straps under the pontoon tubes, not over the fencing. Straps that go over the fence create pressure points on the railing that bend fence posts over time.
- Buckle placement: Position buckles so they do not rest against the hull or fencing. A buckle vibrating against aluminum in wind will wear through anodizing and leave scratch marks.
Final check — the water test
Pour a bucket of water on every flat section of the cover. Water should run off within 5 seconds toward the sides. If water pools anywhere, adjust the support pole height or position under that section until the water sheds. Standing water is the #1 cover killer — it stretches the fabric, breeds mildew, and adds weight that pulls straps loose.
❄️ Winter Storage: What Changes
Winter storage adds three challenges that between-use covering does not: snow load, freeze/thaw moisture, and months of continuous UV exposure. Adjust your setup accordingly.
Snow load support
A standard mooring cover is not designed for snow. Even 3 inches of wet snow weighs 30–50 lbs per section — enough to collapse support poles and stretch the fabric permanently. For outdoor winter storage:
- Use a dedicated winter cover rated for snow load (900D+ material)
- Add 2 additional support poles beyond what you use for mooring
- Increase pole height so the slope angle is steeper — snow slides off steep slopes before accumulating
- Check and brush off snow after every storm — do not let it accumulate and freeze into ice, which is far heavier and harder on the fabric
Ventilation
A sealed cover traps moisture from rain, snowmelt, and condensation. Over a 4–5 month winter, trapped moisture grows mildew on every fabric surface inside the boat — seats, carpet, console padding, stored life jackets.
- Leave 2–3 inch gaps at the bow and stern between the cover and the hull for air circulation
- Use cover vents (snap-in mesh vents, $8–$15 each) — install at least 2 on opposite sides of the cover
- Place moisture absorber containers (DampRid) inside the boat under the cover — 2 for boats under 22 feet, 3–4 for larger boats
Shrink wrap alternative
Marine shrink wrap ($300–$500 professionally applied) is the gold standard for outdoor winter storage. The heat-sealed plastic creates a rigid shell that sheds snow, prevents UV damage, and includes built-in vents. The drawback: it is single-use and creates plastic waste each spring. Owners on PontoonForums are split on whether the environmental tradeoff is worth it.
🔍 Why Amazon Covers Fail (and What to Buy Instead)
The top-selling pontoon covers on Amazon share three problems that forum members consistently report:
- Non-solution-dyed fabric. Budget covers use surface-dyed polyester that fades in one season of UV exposure. Solution-dyed fabric (where the color goes through the entire fiber) costs more but holds color and UV resistance for 5–7 years.
- Single-stitched seams. Water wicks through needle holes in single-stitched seams. Marine covers use double or triple-stitched seams with seam tape or sealant. Check the product photos — if you can see single-row stitching, expect leaks by season two.
- Thin webbing straps with plastic buckles. Plastic buckles become brittle in UV and snap in cold weather. The straps themselves are often 1" nylon that stretches when wet. Quality covers use 1.5"+ polypropylene straps (does not absorb water) with stainless or heavy-duty nylon buckles.
🛡️ Cover Maintenance: 10 Minutes That Add Years
- Rinse with fresh water after every removal. Tree pollen, bird droppings, and salt residue (if stored near saltwater) break down fabric coatings. A garden hose rinse takes 2 minutes.
- Clean mildew immediately. Mix one cup white vinegar with one gallon warm water. Spray affected areas, scrub with a soft brush, rinse thoroughly. Do not use bleach — it destroys UV coatings and weakens stitching. For stubborn stains, see our pontoon cleaner comparison.
- Reapply water repellent annually. 303 Fabric Guard or Star Brite Waterproofing restores the DWR (durable water repellent) coating that sheds rain. Independent fabric waterproofing spray testing by Boating Magazine confirms these products perform well on marine fabrics. Apply to a clean, dry cover and let it cure 24 hours before use. $15–$20 per application.
- Inspect stitching and grommets at season start. Re-stitch any loose seams with UV-resistant thread before they unravel. Replace corroded grommets before they tear through the fabric. A $5 grommet kit and 10 minutes prevents a $400 cover replacement.
- Store the cover folded, not stuffed. Stuffing a cover into a bag creates permanent creases that crack the fabric coating. Fold the cover loosely and store in a breathable bag in a dry location. Never store a wet cover — mildew starts within 48 hours.
Related Gear
A good cover protects what is underneath — but it does not fix damage that is already there. If your bimini frame is corroding, see our stainless bimini upgrade guide before covering a frame that is failing. For the full list of owner-vetted gear, see the handy hints and gadgets directory.